Happy Sunday everyone!! I hope you are all doing well.
It is a PERFECT day in Connecticut today-mid 60's, low humidity with the sun shining. I spent some time outside watering my plants and planting some basil seeds in my skimpy veggie garden. We only are ever successful with tomatoes. Every time I have planted any kind of cucumber or squash, cucumber beetles kill my plants no matter what I do.
Below is the sketch that inspired this card:
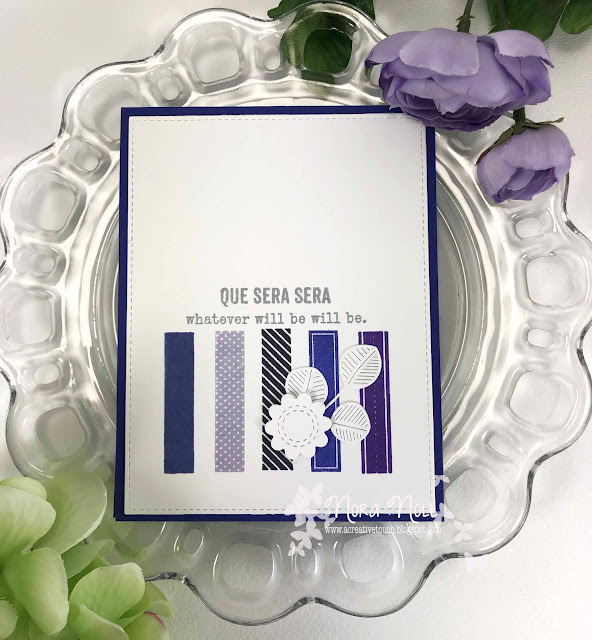
Instead of having the design at the top, I kind of "flipped" the sketch to have it at the bottom. I also could NOT have my rectangle images not be uniform.
I have been trying to use more of the stamps that I own so I dug out this old PaperTrey Ink set, "Building Blocks" to use on this card. I used five different shades of purple ink to stamp each of the five images.
I added a white die cut flower from MFT and Eucalyptus Leaves from Simon Says Stamp.
Supplies:
Stamps: PaperTrey Ink Building Blocks
Now for some cards for the Online Card Class Spring Stamp Camp 2. I still have not done all of my "homework" but I have worked on some. I have not created cards with everything I have made, though.
My first card is my homework from Day 6.
I cut up the cardstock and layered it on the bottom of my white card base. I then added a MFT diecut sentiment and sentiment strip at the bottom.
I die cut a ton of sentiments last weekend and glued three of them together to give them a little lift. I usually do this as I make my cards but I have been trying to be more efficient and have some die cuts pre-made to add to my cards.
Smile Card:
Paper: PTI Pale Peony, Raspberry Fizz, Neenah Solar White, Lawn Fawn Black Licorice Cardstock
Ink: Hero Arts Unicorn Pigment Ink
Dies: MFT Smile
Stamps: MFT Smiles, Pink Fresh Studio Enchanted Blooms
Other: Gemini Jr., Ranger Multi Matte, Scotch Dot Adhesive Roller, Foam Adhesive, MISTI, Wagner Heat Tool, Ranger Super Fine White Embossing Powder
For my next three cards, I used a really cool technique by
Dawn Woleslagle from WPlus9. We learned this on Day 19. Instead of making my embellishments for these cards, I embellished some pre-made die cuts from Pink Paislee.
I actually never do this type of thing but love designers like
Jeanne Jachna that use pre-made embellishments on their projects. I have a TON left over from my scrapbook days and I recently bought these because I fell in love with them at the store. They make me HAPPY!!!
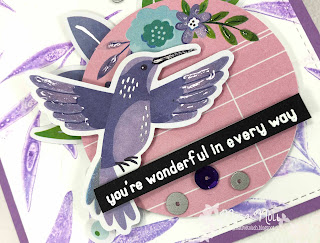
Dawn taught us how to do mono printing with Ranger Distress Oxides. I cannot say that I was that successful BUT it was fun to try!!
I embellished my my die cuts with some Aqua Shimmer Pen and Glossy Accents.
The sequins were added in purple and silver. The sentiment is from Reverse Confetti.
Wonderful Supplies:
Paper: Neenah Solar White, SSS Lavender Purple, Lawn Fawn Black Licorice Cardstock
Stamps: WPlus9 Winter Greenery, Reverse Confetti So Many Sentiments,
Dies: MFT Blueprints 13, Stampin Up Doily Builders
Ink: Wilted Violet Distress Oxide Ink, Shaded Lilac Distress Oxide Ink,
Die Cuts: Pink Paislee Bloom Street Ephemera
Other: Nuvo Aqua Shimmer Pen, Glossy Accents, Foam Adhesive, Gemini Jr., Ranger Multi Matte, Scotch Dot Adhesive Roller, Wagner Heat Tool, Ranger Super Fine White Embossing Powder, Gelli Plate
My second card used the printing part of the technique.
This was my FAVORITE card of the bunch. I think the background is so cool. Most of my examples did not come out like this, though.
On this card I added a Stampin Up doily die cut with the pre-made die cuts.
I also added some purple Nuvo drops instead of sequins on this card.
Bloom Supplies:
Paper: Neenah Solar White, Pink Paislee Bloom Swatchbook, Stamps: WPlus9 Winter Greenery, Reverse Confetti So Many Sentiments,
Dies: MFT Blueprints 13
Die Cuts: Pink Paislee Bloom Street Ephemera
Ink: Wilted Violet Distress Ink, Shaded Lilac Distress Oxide Ink, Lawn Fawn Jet Black Ink
Other: Nuvo Aqua Shimmer Pen, Glossy Accents, Foam Adhesive, Gemini Jr., Ranger Multi Matte, Scotch Dot Adhesive Roller, Crushed Grape Nuvo Drops, Gelli Plate
My last card I used the same technique but used green and pink oxide ink.
Again I used the pre-made die cuts for the card. I added an MFT smile die cut for the sentiment.
I added some Aqua Shimmer and Glossy Accents over the top of it to make it SHINE.
I altered the sentiment strip to say what I wanted it to say. I used some foam adhesive to pop it up off the card.
Using these pre-made die cuts was a lot of fun and I have a TON left over to make more cards at a later date!!
Smile, Laugh, Be Happy Supplies:
Paper: Neenah Solar White, PTI Vintage Jadeite
Stamps: WPlus9 Winter Greenery, Reverse Confetti So Many Sentiments,
Dies: Stampin Up Doily Builders, MFT Blueprints 13, MFT Smile Die
Ink: Cracked Pistachio Distress Oxide Ink, Spun Sugar Distress Oxide Ink, Lawn Fawn Jet Black Ink
Die Cuts: Pink Paislee Bloom Street Ephemera
Other: Nuvo Aqua Shimmer Pen, Glossy Accents, Foam Adhesive, Gemini Jr., Ranger Multi Matte, Scotch Dot Adhesive Roller, Gelli Plate
I think that is all from me today. I could add a ton more but won't. This class was a BLAST and even though it isn't live anymore, I would recommend for others to take.
I thank you for stopping by. Have a FABULOUS night!!